
Mehndi Design Easy Easy: Simple and Beautiful Henna Styles for Beginners
Mehndi, or henna, has been a celebrated art form for centuries. Whether it’s for weddings, festivals, or casual occasions, mehndi designs can enhance your look effortlessly. If you’re a beginner searching for “mehndi design easy easy,” this guide is perfect for you. We’ll explore simple techniques, answer common queries, and share tips to create stunning henna patterns with minimal effort.
Understanding Mehndi Design Easy Easy Techniques

The phrase “mehndi design easy easy” represents simple, beginner-friendly henna patterns that anyone can create. These designs focus on basic shapes like dots, lines, and curves, which blend beautifully to form intricate-looking art.
Why Opt for Easy Mehndi Designs?
Many prefer easy mehndi designs due to their simplicity and versatility. They’re perfect for practice, quick applications, or impromptu events when time is limited. You don’t need to be an artist; just a steady hand and patience!
External Information – Fun Fact
Did you know? Henna has been used for over 5,000 years! According to a study by the National Library of Medicine, henna not only serves as a cosmetic adornment but also has cooling properties, making it culturally significant in warm regions.
Tips and Tricks for Creating Easy Mehndi Designs
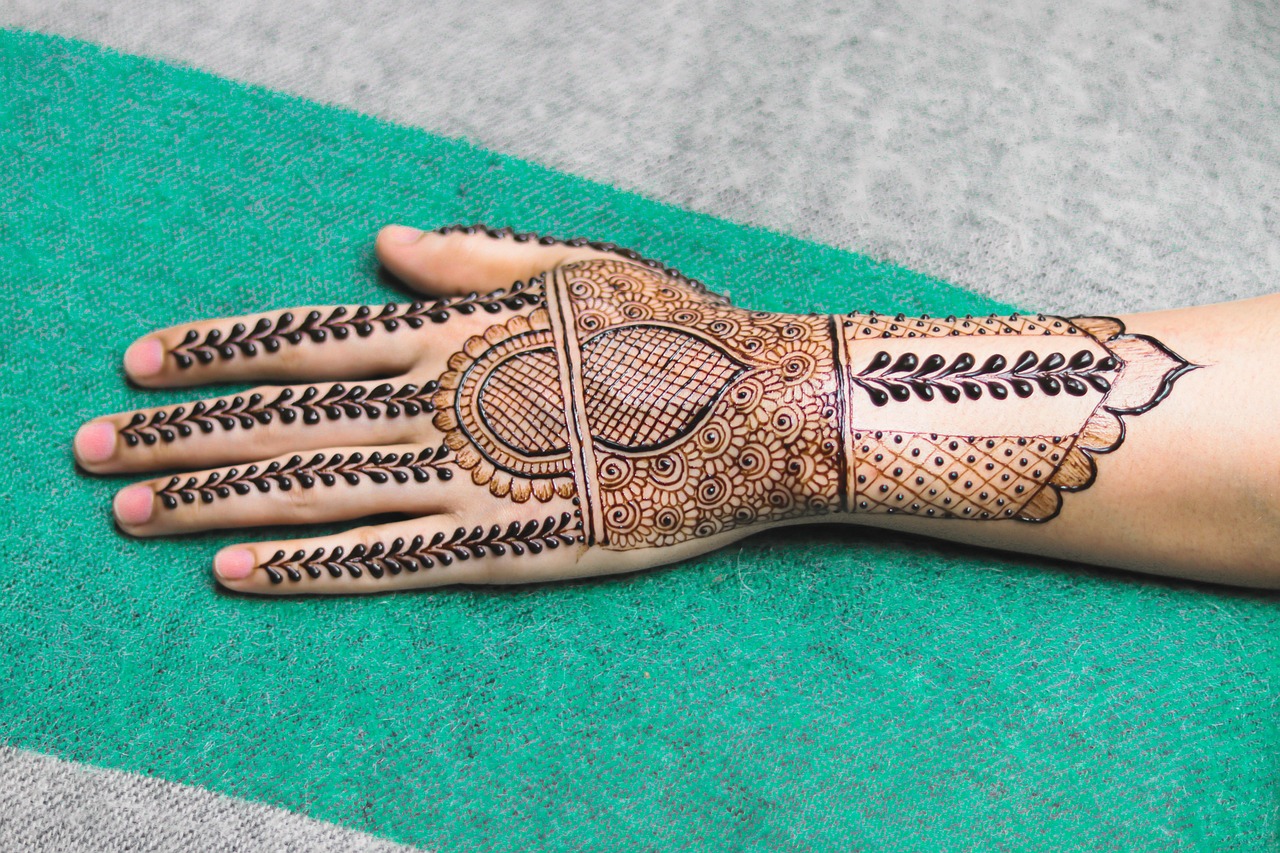
When starting with mehndi design, it’s important to focus on patterns that combine basic shapes. Here are some key tips:
- Start with a basic flower as your central design.
- Add repetitive patterns like vines or dots for symmetry.
- Practice small motifs, such as paisleys and teardrops, to enhance the design.
How Can Beginners Achieve Symmetry in Mehndi Designs?
Beginners often struggle with keeping designs balanced. One simple tip is to draw a faint outline with a pencil on the skin as a guide or practice on paper beforehand.
External Information – Case Study
A well-known expert in the field, Divya Patel, shares that beginners should focus on achieving symmetry by dividing the hand into sections and designing each segment evenly. This not only ensures balance but also looks professional.
Practicing “Mehndi Design Easy Easy” Patterns at Home
One of the best ways to improve your skills is by practicing regularly. Here’s a step-by-step guide:
- Purchase a ready-made henna cone or make your own henna paste at home.
- Draw a basic floral design in the center of your palm.
- Add simple curves, dots, and lines around it for a cohesive look.
What are Some Common Mistakes to Avoid?
Common mistakes include applying too much pressure on the cone, drawing uneven lines, and not allowing the mehndi to dry properly. Remember to let your design dry for at least 2-3 hours to achieve a dark stain.
External Information – Expert Tip
According to expert artist Naila Khan, for a richer stain, after your henna dries, seal it with a mixture of lemon juice and sugar. This helps keep the paste moist, allowing the dye to seep deeper into the skin.
Conclusion
Creating “mehndi design easy easy” styles is all about mastering the basics and building from there. With practice, patience, and the tips shared above, you’ll be ready to adorn your hands with beautiful, simple designs in no time. Ready to get started on your mehndi journey? Share your creations with us in the comments, or subscribe to our newsletter for more helpful guides!